TVM/NNVM graph compiler

Posted by Sz Zheng on 2019-11-05

NNVM 探究


1. 前言:

2017年亚马逊推出了NNVM编译器。该编译器为深度学习而设计,主打网络层面编译,能够将前端框架的网络编译优化并使用TVM完成代码生成,从而能直接在后端硬件上运行。它支持的前端有MXNet, Caffe, Keras, PyTorch, Caffe2, CNTK等。
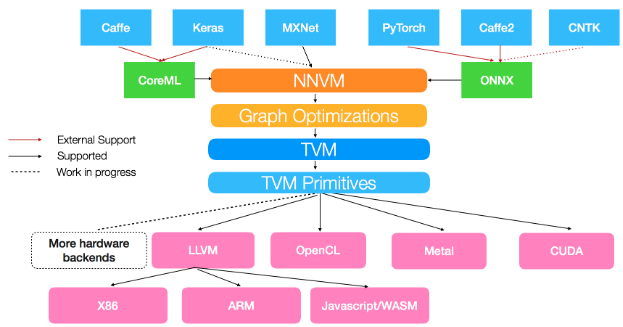
nnvm框架
图1: NNVM框架图,图源在此


2. 使用:

虽然NNVM能够直接从深度学习框架编译计算图,我们也可以直接使用NNVM原生符号定义计算图,比如定一个卷积加ReLU的模块:

1
2
3
4
5
6
7
8
9
10
11
12
13
def conv2d_block(data, name, channels, kernel_size=(3, 3), strides=(1, 1), padding=(1, 1)):
conv2d = sym.conv2d(
data=data,
channels=channels,
kernel_size=kernel_size,
strides=strides,
padding=padding,
use_bias=False,
layout="NCHW",
name=name + "_conv2d"
)
act = sym.relu(data=conv2d, name=name + "_relu")
return act

这里面的sym.conv2d就是NNVM自带的符号,这个模块定义时,定义符号时使用的参数主要和图上节点有关,其写法和tensorflow很相近。完整的符号表可以参考这里
定义好的网络可以由以下函数进行编译:

1
2
3
4
5
6
7
8
9
10
11
12
13
output = single_net()
data_shape = (1, 3, 448, 448)

compute_graph = nnvm.graph.create(output)
ctx = tvm.context("cuda", 0)
params = generate_random_parameters(compute_graph, "data", data_shape, with_input=True, context=ctx)
input_data = params["data"]
deploy_graph, lib, params = nnvm.compiler.build(compute_graph, target="cuda",
shape={"data": data_shape}, params=params)
module = graph_runtime.create(deploy_graph, lib, ctx)

module.run(data=input_data)
output = module.get_output(0, None)

首先经过nnvm.graph.create得到compute_graph,然后nnvm.compiler.build会根据这个计算图以及给定的图上参数编译整个计算图,生成的结果可以交给graph_runtime生成可运行模块,并运行。这里面graph_runtime来自于TVM,这里暂且不关注。本文中首先关注前两个函数做了什么。


3. 追踪

3.1 nnvm.graph.create

在Python中追踪这个函数,可以发现它实际上调用了C++的函数NNGraphCreate,其函数体非常短:

1
2
3
4
5
6
7
int NNGraphCreate(SymbolHandle symbol, GraphHandle *graph) {
Graph* g = new Graph();
API_BEGIN();
g->outputs = static_cast<Symbol*>(symbol)->outputs;
*graph = g;
API_END_HANDLE_ERROR(delete g);
}

基本上就是把给定符号的输出列表交给了新建的图,定义为图的输出列表。注意到我们使用nnvm.graph.create时传给它的就是整个计算图的最后一个节点,所以这里创建的图首先获得的是整个计算图的最后输出定义。

3.2 nnvm.compiler.build

追踪这个函数,首先进入nnvm/python/nnvm/compiler/build_moduole.py中的build函数,将这个函数分成不同的部分进行讲解:

Part I

1
2
3
4
target = target if target else tvm.target.current_target()
if target is None:
raise ValueError("Target is not set in env or passed as argument.")
target = tvm.target.create(target)

第一部分是创建target,一般传入的target是个字符串,如opencl -device=intel_graphics,llvm -mcpu=skylake-avx512等,然后调用target.create根据字符串创建target,这个创建过程中,会将opencl这种称作target_name-device=后的内容称作device_name,此外还可以传入多个option,记录在options_array中。

Part II

1
2
3
4
5
6
# If current dispatch context is fallback context (the default root context),
# then load pre-tuned parameters from TopHub
if isinstance(autotvm.DispatchContext.current, autotvm.FallbackContext):
tophub_context = autotvm.tophub.context(target)
else:
tophub_context = autotvm.util.EmptyContext()

第二部分代码涉及到了autotvm,这是TVM用于调优代码的部分。这里通过上面得到的target名字来寻找调优好的参数。TVM官方提供了一部分预先调好的优化参数,存放在一个缓冲目录中,如果你恰巧在对应设备上使用了对应的运算,那么就可以直接复用参数。一般来说,这些参数会存放在~/.tvm/tophub/下,比如笔者的该目录下存放有cuda_v0.04.logllvm_v0.03.log两个文件,打开cuda_v0.04.log,可以看到:

1
2
3
4
5
6
# This is the pre-tuned parameters for cuda backend
# TVM downloaded this during compilation
{"i": ["cuda -model=titanx", "topi_nn_conv2d", [["TENSOR", [1, 2048, 8, 8], "float32"], ["TENSOR", [192, 2048, 1, 1], "float32"], [1, 1], [0, 0], [1, 1], "NCHW", "float32"], {}, ["conv2d", [1, 2048, 8, 8, "float32"], [192, 2048, 1, 1, "float32"], [1, 1], [0, 0], [1, 1], "NCHW", "float32"], {"i": 8797896, "c": null, "e": [["tile_f", "sp", [6, 1, 32, 1]], ["tile_y", "sp", [4, 1, 2, 1]], ["tile_x", "sp", [1, 1, 8, 1]], ["tile_rc", "sp", [64, 32]], ["tile_ry", "sp", [1, 1]], ["tile_rx", "sp", [1, 1]], ["auto_unroll_max_step", "ot", 1500], ["unroll_explicit", "ot", 1]], "t": "direct"}], "r": [[5.69732536806342e-05], 0, 14.116215467453003, 1535423916.7184713], "v": 0.1}
{"i": ["cuda -model=titanx", "topi_nn_conv2d", [["TENSOR", [1, 2048, 8, 8], "float32"], ["TENSOR", [448, 2048, 1, 1], "float32"], [1, 1], [0, 0], [1, 1], "NCHW", "float32"], {}, ["conv2d", [1, 2048, 8, 8, "float32"], [448, 2048, 1, 1, "float32"], [1, 1], [0, 0], [1, 1], "NCHW", "float32"], {"i": 734204, "c": null, "e": [["tile_f", "sp", [28, 2, 8, 1]], ["tile_y", "sp", [2, 2, 2, 1]], ["tile_x", "sp", [1, 1, 8, 1]], ["tile_rc", "sp", [64, 32]], ["tile_ry", "sp", [1, 1]], ["tile_rx", "sp", [1, 1]], ["auto_unroll_max_step", "ot", 0], ["unroll_explicit", "ot", 0]], "t": "direct"}], "r": [[9.882545781556573e-05], 0, 20.854647159576416, 1535425623.6315196], "v": 0.1}
{"i": ["cuda -model=titanx", "topi_nn_conv2d", [["TENSOR", [1, 2048, 8, 8], "float32"], ["TENSOR", [384, 2048, 1, 1], "float32"], [1, 1], [0, 0], [1, 1], "NCHW", "float32"], {}, ["conv2d", [1, 2048, 8, 8, "float32"], [384, 2048, 1, 1, "float32"], [1, 1], [0, 0], [1, 1], "NCHW", "float32"], {"i": 1240970, "c": null, "e": [["tile_f", "sp", [12, 1, 16, 2]], ["tile_y", "sp", [2, 2, 2, 1]], ["tile_x", "sp", [1, 1, 8, 1]], ["tile_rc", "sp", [32, 64]], ["tile_ry", "sp", [1, 1]], ["tile_rx", "sp", [1, 1]], ["auto_unroll_max_step", "ot", 0], ["unroll_explicit", "ot", 0]], "t": "direct"}], "r": [[8.448735867117118e-05], 0, 14.069890975952148, 1535426980.678347], "v": 0.1}
{"i": ["cuda -model=titanx", "topi_nn_conv2d", [["TENSOR", [1, 2048, 8, 8], "float32"], ["TENSOR", [320, 2048, 1, 1], "float32"], [1, 1], [0, 0], [1, 1], "NCHW", "float32"], {}, ["conv2d", [1, 2048, 8, 8, "float32"], [320, 2048, 1, 1, "float32"], [1, 1], [0, 0], [1, 1], "NCHW", "float32"], {"i": 5709779, "c": null, "e": [["tile_f", "sp", [10, 1, 16, 2]], ["tile_y", "sp", [2, 1, 2, 2]], ["tile_x", "sp", [1, 1, 8, 1]], ["tile_rc", "sp", [32, 64]], ["tile_ry", "sp", [1, 1]], ["tile_rx", "sp", [1, 1]], ["auto_unroll_max_step", "ot", 0], ["unroll_explicit", "ot", 1]], "t": "direct"}], "r": [[8.139676807712908e-05], 0, 3.966081380844116, 1535427983.421136], "v": 0.1}

这里注明了,该文件是编译TVM时自动下载的,文件内容的前几个条目都是在titanx上调优二维卷积的结果,对应的卷积输入大小也写明了。
tophub_context会加载这些文件保存起来,留着后续使用。接下来所有的操作都会在tophub_context的scope中进行(with tophub_contex:)。

Part III

1
2
3
4
5
6
7
8
9
10
shape = shape if shape else {}
if not isinstance(shape, dict):
raise TypeError("require shape to be dict")
for value in shape.values():
if not all(isinstance(x, tvm._ffi.base.integer_types) for x in value):
raise TypeError("shape value must be Integer types iterator")

cfg = BuildConfig.current
graph = graph if isinstance(graph, _graph.Graph) else _graph.create(graph)
shape, dtype = _update_shape_dtype(shape, dtype, params)

这里会检测传进来的graph是否已经是Graph数据结构,如果不是,则重复一下nnvm.graph.create的工作,_update_shape_dtype会根据传进来的参数params纠正shapedtype(必要时报错)。

Part IV

1
2
3
4
5
6
7
8
9
10
11
12
13
14
15
16
17
# correct layout if necessary
layout = layout if layout else {}
graph = graph_attr.set_layout_inputs(graph, layout)
graph = graph.apply("CorrectLayout")
index = graph.index
layouts = graph.json_attr("layout")
layout = {x: layouts[index.entry_id(x)] for x in index.input_names}
# Initial pass do shape type inference
ishape, _ = graph_util.infer_shape(graph, **shape)
shape.update(zip(graph.index.input_names, ishape))
if not isinstance(dtype, str):
idtype, _ = graph_util.infer_dtype(graph, **dtype)
dtype.update(zip(graph.index.input_names, idtype))
# Initialize all variables specified in _all_var_init
init_var = {}
if _all_var_init:
init_var = initialize_variables(shape, dtype)

进行layout检查和纠正,以及初始化。这里就先略写了。

Part V

1
2
with target:
graph = optimize(graph, shape, dtype, layout)

这里进行了一些优化,跟踪进optimize函数:

1
2
3
4
5
6
7
8
9
10
11
12
13
14
15
16
17
18
19
20
cfg = BuildConfig.current
if cfg.pass_enabled("AlterOpLayout"):
layout = layout if layout else {}
graph = graph_attr.set_layout_inputs(graph, layout)
graph = graph.apply(["CorrectLayout"])

graph = graph_attr.set_shape_inputs(graph, shape)
graph = graph_attr.set_dtype_inputs(graph, dtype)
graph = graph.apply(["InferShape", "InferType", "AlterOpLayout"])
graph = graph_attr.set_layout_inputs(graph, layout)
graph = graph.apply(["CorrectLayout"])

if cfg.pass_enabled("SimplifyInference"):
graph = graph_attr.set_shape_inputs(graph, shape)
graph = graph.apply(["InferShape", "SimplifyInference"])

if cfg.pass_enabled("FoldScaleAxis"):
graph = graph_attr.set_shape_inputs(graph, shape)
graph = graph.apply(["InferShape", "FoldScaleAxis"])
return graph

可以看到AlterOpLayout部分做的事情和前面的部分几乎一样,这里总是会询问cfg.pass_enabled,而cfg.pass_enabled会查看自己的add_pass属性是否记录了当前优化,如果有则实施优化,否则会查看自己的优化层次数opt_level,如果不小于当前的优化层次,也会实施优化。cfg的默认设置是"opt_level": 2, "add_pass": None,而AlterOpLayout对应的opt_level=3,所以这一分支一般不会进入,除非用户指明了新的opt_level

1
2
3
4
5
6
7
OPT_PASS_LEVEL = {
"SimplifyInference": 0,
"PrecomputePrune": 2,
"OpFusion": 1,
"FoldScaleAxis": 3,
"AlterOpLayout": 3,
}

SimplifyInference则是一定会执行的优化阶段,通过graph.apply函数,可以将优化pass作用在graph上。跟踪SimplifyInference,在nnvm/compiler/simplify_inference.cc中找到了对应函数,可以看到主要对两个算子进行简化优化:batch_normdrop_out。对于batch_norm,主要是将batch_norm(data)形式的计算变化成scale * data + shift的形式,这样做的理论根据是:TVM只面向inference,所以不像training时需要完整地做完batch normalization的所有操作,有时候batch size甚至是1,计算就更加简便了,在这篇博客中也讨论了这一点。对于drop out,则是直接丢掉。

最后是FoldScaleAxis优化,在Relay论文中介绍了这个优化,其主要思想是将卷积操作前/后的常量乘法尽量挪进固定参数中,这样可以支持一些特殊设备(比如做不了标量运算的加速器)。NNVM中实现的算法大致也是这个思路。

Part VI

1
2
3
4
5
6
7
# Clear extra params without nodes.
_remove_noref_params(params, graph)

# Precompute prune
if params and cfg.pass_enabled("PrecomputePrune"):
graph, params = precompute_prune(graph, params)
shape, dtype = _update_shape_dtype(shape, dtype, params)

这里主要做清除冗余参数,也选择略写了。

Part VII

1
2
3
4
5
6
7
8
9
10
11
12
13
14
15
16
17
# Operator Fusion and generation
graph = graph_attr.set_shape_inputs(graph, shape)
graph = graph.apply("InferShape")
graph = graph_attr.set_dtype_inputs(graph, dtype)
graph._set_json_attr("target", str(target), "str")
if target_host is not None:
graph._set_json_attr("target_host", str(target_host), "str")
if cfg.pass_enabled("OpFusion"):
graph._set_json_attr("opt_level", 1, "int")
else:
graph._set_json_attr("opt_level", 0, "int")
graph = graph.apply("InferShape").apply("InferType")
graph = graph.apply("GraphFindFusibleGroups")
graph = graph.apply("GraphFuse")
with target:
graph = graph.apply("GraphCompile")
libmod = graph_attr._move_out_module(graph, "module")

这里进行了很关键的两步:fusion和compilation。
对于图融合,首先寻找可合并的区域(GraphFindFusibleGroups),这一步会将图分割成多个区块,每个区块将独自被编译成一个算子;随后进行图融合(GraphFuse)。
在NNVM中定义了不同算子的合并模式(pattern),包括:

1
2
3
4
5
6
7
8
9
10
11
12
13
14
15
16
17
18
enum OpPatternKind {
// Elementwise operation
kElemWise = 0,
// Broadcasting operator, can always map output axis to the input in order.
// for example :code:`out[i, ax1, j, ax2] = input[i, j]`.
// Note that the axis need to be in order so transpose is not a bcast operator.
kBroadcast = 1,
// Injective operator, can always injectively map output axis to a single input axis.
// All injective operator can still be safely fused to injective and reduction.
kInjective = 2,
// Communicative reduction operator.
kCommReduce = 3,
// Complex operation, can still fuse elemwise operations into its output.
// but cannot chain another complex op
kOutEWiseFusable = 4,
// Opaque operation, cannot fuse anything.
kOpaque = 8
};

算子在被定义的时候,就已经被打好了标签属于哪类模式,比如二维卷积的pattern就在nnvm/python/nnvm/top/nn.py中被定义为kOutElementwiseFusable: reg.register_pattern("conv2d", OpPattern.OUT_ELEMWISE_FUSABLE)
此外,在NNVM中还定义了不同的合并规则(rule),包括:

1
2
3
4
5
6
// The single fuse rule.
enum class FuseRule {
kUknown,
kFuseToMaster,
kRealize
};

在进行fuse的时候,先把整个计算图按照后序深度遍历进行拓扑排序,处理时按照从图的输入节点开始的顺序,保证每个被处理的节点的输入节点先于它本身被处理。

接下来描述fuse的算法
在fuse过程中,引入一个概念叫master node, 每个节点都会有自己的master node。

第一步:确定fuse规则。
遍历拓扑排序后的节点序列:

  1. 对于网络参数,对应的规则都是kRealize
  2. 当前节点n的pattern如果是kElemWise或者kBroadcast,则看其输入节点(inputs属性):
    如果有输入节点e仍然没有确定如何fuse(kUknown),则看e的pattern:
    • 如果e的pattern是kElemWise或者kBroadcast,则确定其fuse规则为kFuseToMaster
    • 如果e的pattern是kInjective,也确定其fuse规则是KFuseToMaster
    • 如果e的pattern是kOutEWiseFusable,且n还没有确定自己的master node,且shape_vec[idx.entry_id(nid, 0)] == shape_vec[idx.entry_id(e)](这一条件还没有看得太明白,目前的理解是n的第一个输出张量的shape与e的输出中被n使用的那个张量的shape一致时),就将n的master node确定为e的master node且设置e的fuse规则为kFuseToMaster
    • 其余情况,一律将e的fuse规则设置为kRealize
  3. 当前节点n的pattern如果是kInjective或者kCommReduce,则看其输入节点,对于没有确定fuse规则的节点,只要其pattern是kElemWise或者kBroadcast,就把其规则设定为KFuseToMaster,否则设置为kRealize。如果n的pattern是kCommReduce,那么他自己就是自己的master node
  4. 剩下的情况,n的master node就是自己,且其所有未确定fuse规则的输入节点的fuse规则都设置为kRealize
    用一个小例子说明上述过程,这个例子来自NNVM源代码的注释:
1
2
3
4
5
6
7
8
   conv2d
/ | \
/ | \
op1 op2 op3
\ | /
\ | /
add
|

这里面除了卷积,其它的都是element-wise操作。那么首先,遍历顺序是[conv2d, op1, op2, op3, add],conv2d属于kOutEWiseFusable,所以进入第4个情况,以自己为master node。op1-3情况相似,都会进入情况2的第三点,将conv2d看作master node, 且设置conv2d的fuse规则为kFuseToMaster; 对于add,会设置op1-3的fuse规则为kFuseToMaster,但是其自己没有子节点,不会被子节点设置,且master node不确定,算法中有处理这种节点的逻辑,这里没有详细陈述,只说明结果是master node为自己,fuse规则为
kRealize

第二步:根据fuse规则建立group,这里会根据kFuseToMaster从输出节点向上传播group id,但是对于pattern为kOutEWiseFusable的节点,不会向上传播group id,对上面的例子,结果就是conv2d自己一个group,其余节点一个group。

第三步:每个节点如果自己的输出张量被多个节点用了,且这些子节点都在一个group且他们的pattern都是kElemWise或者kBroadcast,那么该节点会加入子节点的group,成为这个group的master,对上述例子,所有节点都会进入一个group,以conv2d为master node。

至此已经标记了所有的group和master node。后续工作是根据标记结果,对每个group生成一个子图。生成代码的单位是子图,对于子图代码生成的探究将后续进行,这里就不详细说明了。

Part VIII

1
2
3
4
5
6
# Write variable initial values into params
if init_var:
if params is None:
params = {}
params.update(init_var)
return graph, libmod, params

最后返回。